Editing Building Models
Most of the Edit Actions that happen to the stage feature classes during the staging process can be described as "Updated Status Attributes". The Update Edit Fields task facilitates updating the Edit fields by looking for records in each of the Stage feature classes (except for Stage_NewModels_MP) that have a Record Modify date later than both the Recode Init Date and the Edit Date. These are records that have been modified during at somepoint inthe lifespan of the ModelMgt workspace, but that have not yet had their edit fields updated. These records have a new Edit Date assigned and the value of Edit User is set to be the same as the Record Modified user.
It would be cool to be able to preserve the original Record Modified date, but unfortunately ArcGis updates the modification date before doing the modification.
Model Edit Flagging and Workflows
In the course of your adventures trying to fit new models into their urban context you wil have come across various situations where models need to be edited or created. Normally these situations are flagged for attention later. There are four model editing scenarios that eachhave their own workflows soitmakes sense to accumulate this work and handle edits when you can shift intoa different mode.
Here are the edit workflows and how to flag them:
- New Model: Flag in Issue Points feature class.
- Create in external editor, handle with model import workflow.
- ArcGIS Model Creation Workflow.
- Model 3D Edit: Flag with QA Flag = 3D Edit
- Modify in in external editor, handle with model import workflow.
- ArcGIS model editing workflow.
- Surface Edits:
- Remove Materials (Textures or Colors): QA Flag = Remove Color
- Use surface edit workflow
- Flip Surface Normals (all faces): QA Flag = Flip Faces
- Use surface edit workflow
- Flip Surface Normals (subset of faces): Flag with QA Flag = 3D Edit
- Must be edited with external editor and imported with model import workflow. .
- Remove Materials (Textures or Colors): QA Flag = Remove Color
Setting Status for Edited Models
When models are flagged for editing, there are two options for dealing with the status of the prior version of the model.
In the case of 3D model edits, if a model is being split to reflect a demolition of part of the real world structure, then the status for the prior model should be set toModified so that the original model of the prior condition will be routed to the History_MP feature class. See the note on How the Modified Model Status Saves You Time.
If a model is flagged for 3d Edits for a repair, or if themodel splitting operation is going to produce complete models of the persistent part of the structure as well as a model of the portion of the structure that will be removed, then the status of the prior model should be set to Retired
In the case of surface edits when the new model is geometrically identical with the prior version, the status of the prior model would be set to Expunge.
Workflow Creating Editing Models Outside of ArcGIS
3D editing tools are very diverse in terms of their capabilities and interfaces. It makes sense that people are inclined to use tools that they are familiar with. The capabilities of ArcGIS Pro for 3D model creation and editing are a moving target. It has been my experience that there are some models that are not easy to edit in ArcGIS. But I know that this is an area that ESRI is working on.
For any of the model creation or editing workflows, it should be easy to use the downloadable models from The Repository Catalog to use as source material. Inmost cases, recent orthophotography is available for use with the tiled models.
The products of these edits would then be introduced through the normal model import process described above.
Workflow for Editing and Creating Models with ArcGIS Pro
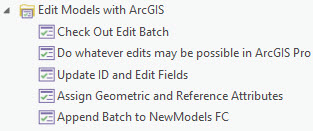
Creating and editing models with ArcGIS is carried out in a Model Batch folder. I recommend starting a new batch for this purpose. If you are editing model from the pre-existing Stage feature classes, you may begin by copying these to a feature class in the Batch Geodatabase. Then you have freedom to try things and make mistakes and check and revise your altered models before pasting or appending them into the Prep_MP feature class. Once there, the procedure for adding model-specific attributes and the automatically generated attributes is the same as outlined in the section on Importing Models.
Models created this way are appended to the Stage_NewModels_MP feature class and integrated into their context just like new models.
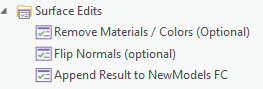
Workflows for Surface Edits
Problems with Surface Normals
One thing that makes 3D models tricker than flat points, lines, and polygons is the problem of lighting and shading. Multipatch objects are made of triangulated faces. Your computer needs to figure out which direction each triangle is facing in order to shade it correctly. The orientation of a face with regard to the light source is known as the Surface Normal. The term "Normal" in this sense refers to vector perpendicular to the face.
It happens that one of the most common forms of corruption in multipatch models occurs when surface normals for some or all of the faces in a model are pointed in the wrong direction. Another way of saying this is that the face or faces are flipped or inside-out. When this happens, faces appear to be invisible when viewed from one side or may appear to be dull -- not reflecting light as they should. These objects also behave badly when you try to color them with ArcGIS symbology.
What is the cause? Multipatch objects do not store surface normals explicitly. Instead, the normal for each face is inferred by a convention called the Right Hand Rule that says that the vertices are recorded in counter-clockwise order from the perspective of the lighted side. With this in mind, it is not difficult to imagine how these inferences might become incorrect. Especially when a less-then-perfect 3D editing tool is used to create hundreds of new faces by cutting or intersecting complex mesh objects. There are situations where the ordering of vertices becomes corrupt causing all subsequent faces to be flipped. This is especially true when the original mesh objects are not validated as closed solids.
If a model is completely inside-out as described in the sidebar: Problems with Surface Normals you can fix it with the geoprocessing tool, 4a. Flip Faces. This tool is accessible through the Surface Edits > Flip Normals task. Note that this tool flips all of the surfaces in all of the input models.
Similarly, the task Surface Edits > Remove Materials / Colors will turn all the faces of all of the input models to white -- which is a requirement if you wish to apply thematic colors to models in ArcGIS Pro.
Both of these workflows can be handled in a ModelBatch folder/geodatabase, but they also can be dealt with with the following steps:
- Select the affected models from their Stage feature class.
- Set the value of QA Flag appropriately.
- Run the task or tool to flip the normals or remove materials.
- The tool creates a new feature class in the Scratch folder and adds it to the table of contents of the 3d scene. New model IDs and and the values for Edit User, Edit Action and Edit Date are appropriately set.
- Check the models.
- Append the fixed models to the Stage_NewModels_MP feature class.
- Set the Status forthe original models to Expunge.
How the Modified Model Status Saves You Time
A common editing workflow comes into play when an existing model needs to be split to accommodate a new model of a proposed structure that will preserve part of the existing one. At the end of the process, you can have a new model that represents the portion if the existing structure that will return to the Active feature class. And you may also end up with have a second new model that represents the "historical" portion of the original structure that is to be demolished. As it happens, this process of model editing may be trickier and more time consuming than we would like.
[Illustration Needed]
For model curators who are primarily future-oriented, there may not be a clear business case for spending half a day trying to neatly dissect both sides of this complex cutting procedure. Asit happens, cutting models can be very difficult -- especially when the models do not verify as being fully closed, or "water tight."
In consideration of this fact, we have established the Modified status for models. The first task is to cut the existing model and to end up with a model that represents the portion that persists. The original model, in its entirety has its status set to Modified. This status will cause the entire old model to be shifted to the History_MP feature class. The new partial model willhave its status set to "Current" and after going through the process of editing and importing through a model batch, it will move through the NewModels_MP feature class and eventually wind up in the Active_MP feature class.
The Disappear Date for modified models should be set to the date when the partial demolition occurs. For the "Current" portion of the model, the Appear Date should be set to the same date. If you think about how a time-slider will work, you can imagine that when rendering a past scenario, the original, whole, model will be displayed up until that date. When the slider moves through the curren time, the modified model will disappear and the new model and the remaining portion of the old model will appear.
It is confusing that the Appear date of the current portion of the modified model is recent, when the actual structure may be 100 years old. This is one reason why this Appear Date is not called Year Built. The original year built for the structure, if it is known could be preserved as the Appear Date on the historical version of the modified model.
This situation is an illustration of why the model collection and its attributes is primarily concerned with Models and not with Buildings.