Model Collection Management Project and Workspace
The collection of 3D building models is the most actively developed and maintained component of the city model. Simple models can be made by extruding building roof-prints, but the best looking models, more accurate models are contributed by designers or photogrammetry specialists. These models originate outside the world of GIS, and therefore are associated with a lineage of source files and procedures. The model collection is discussed in depth on the page The Building Model Collection.
As the model collection moves through time, there are many files and procedures to keep track of! Ideally, we would have a few easy-to-understand principles and patterns for file management that permit any model collection curator to add new models, to promote and demote existing models in such a way that the every decision and resource in the lineage of any model can be re-traced and if need-be, undone. The file management schema should be scalable in such a way that it does not become more complicated as the model grows in terms of numbers or spatial extent. Whan managed accrding to these principles, the model collection will serve as a clear memory of the history of the places that have been measured, or dreamed up over the life-span of the model.
The purpose of this page is to try to explain these simple principles and patterns in hopes that the user will be able to apply them in almost any model management situation. Properly applied, this system should allow any other model curator who understands these principles to pick up the model curation task exactly where the former curator left off.
Table of Contents
- Download Demo Dataset
- Filesystem Context
- Tour of the Model Management Workspace Folder: Data Management
- Lifecycle of a Model Management Workspace
- Archiving Model Batches and GDB Editions
- Tour of the ArcGIS Pro Project: Properties
- Tour of the Scenes, Maps, Layers and Views
- Managing Re-Useable Layers and Styles
- Explore Tasks and Tools
Download Demo Dataset
This documentation wil be most easily understood if you have the demonstration workspace open in ArcGIS Pro. Check the Recent Downloads page to download the most recent version of the ModelMgt workspace annd unzip it in your Bos3d_UserDev/Workspaces/ModelMgt_demo folder.
File System Context
The citySchema architecture makes use of a modular file-system that has evolved over time to provide a scheme for storing assets that does not grow more complicated as the number of assets or their spatial or temporal extent grows. The file system facilitates sharing and syncing of assets between in-house and off-site installations where parts of the city model may be worked on. The demonstration version of the ModelMgt workspace is self-contained so it canbe explored without setting up an elaborate context of source folders. To see how this workflow would be set up in a production environment, visit citySchema Modular File System to learn more about the recommended filesystem context for the ModelMgt workspace.
Tour of the Model Management Workspace
A tour of the ModelMgt workflow folder is useful for orientation to the file organization. It also introduces the main components of the workflow. You can watch the tour on youtube (soon) or follow along with your local copy of the workspace available on github.
Filesystem and Folders
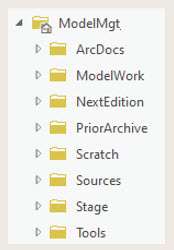
- ArcDocs folder: contains ArcGIS Pro projects where the processing takes place. Layer files are also stored here, to save styling of layers and group layers for re-use within the maps and scenes within the project. Also contains the ArcGIS Task files that hold the step-by-step interactive guide for managing your model collection.
- ModelWork folder: contains the source files for new models that have been submitted for inclusion into the collection. New models that are the result of edits to previously existing models are also stored in the ModelWork folder. Models are organized in batch folders named according to the source and date. This organization allows for the locations of source models to be referenced in the model catalog and easily retrieved in case anyone wants re-visit and modify a model using the original sources. When a ModelMgt workflow folder is retired, the model batch folders are copied to the Cty3D_Archive folder.
- PriorArchive folder: contains the latest archived edition of the Cty3D_Models_YYYYMMDD.gdb. The date string in the name of the geodatabase reflects the date that the collection was issued from a previously retired ModelMgt workflow.
The capability to recover from corruption and errors requires that the lineage of PriorArchive models be continuous from one ModelMgt workflow to the next. This means that edits to the collection that are made outside of a modelMgt workflow may be unrecoverable later.
The PriorArchive folder contains geodatabases and ArcGIS layer (.lyrx) files that are used to view and inspect the model collection.
- NextEdition folder: is the destination for the new editions of City3D_Model geodatabases. A single ModelMgt workflow folder may spawn several new editions, each one carrying a new date string in its name. Each new edition also comes with its lyrx files.
- Stage folder: contains two geodatabases: Stage.gdb which contains copies of all of the prior_archived feature classes which are used for making updates to the Model Status attributes andserve as the source for edits. There is also a Stage_NewModels_MP feature class that contains all of the new models that have been imported or new models that are the results of edits to models frm the Prior_Archived collection. Models from the Stage geodatatabase are used to generate the next edition of the model collection. Each of the feature classes in the Stage.gdb have Stage_ pre-ended to their name.
The Stage\Config.gdb contains the template multipatch feature class reflecting the latest schema for 3D model feature classes. Tables representing domain values are also stored in config.gdb.
- Sources folder: the sources folder contains parcel information, the latest development log and a terrain raster that covers the extent of the city model. These datasets are used tp attach attributes to new building models.
In your production environment, these source datasets may be referenced from other places -- most likely fro within the Bos3d_Master folder
- Tools folder: ArcGIS tool boxes, FME workbench folders, Python scripts, projection files, and lyrx files used in workflows that will be discussed below.
- Scratch folder: is the destination for all intermediate datasets generated by tools. The Scratch\Scratch.gdb is the default workspace for the ArcGIS Pro project -- the destination for all tool outputs that are not otherwise specified.
- Tools folder: is the location for the default ArcGIS toolbox, ModelMgt.tbx and other resources used by tools including Python scripts, FME workbench files, and projection files.
Lifecycle of a Model Management Workspace
The citySchema system uses workspace folders to organize tools and data into self-contained packages that may be re-used, modified and archived. While in use these workspaces provide an environment for re-purposing and customizing tools. After a period of use, a workspace can be zipped and retired to become a frozen archive that preserves all of the decisions and procedures that have been applied.
A model management workspace is intended to produce new editions of the model collection that represent updates to the Prior Archived model collection. In the lifespan of a model management workspace several new editions can be made based on the same Prior Archived collection. The changes carried out on the Stage feature classes are cumulative. Stages in the lifecycle of a model management workspace are depicted in the slideshow, below.
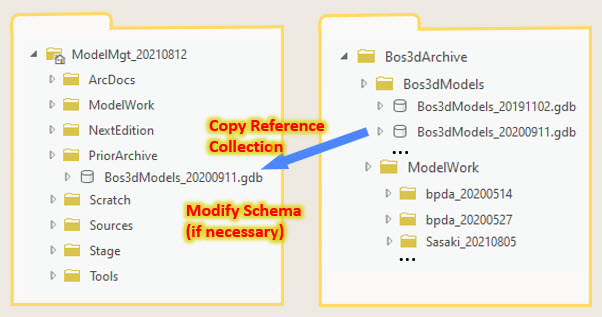
The workspace folder is initialized by copying the latest archived model collection geodatabase from the Archive folder. These will remain read-only.
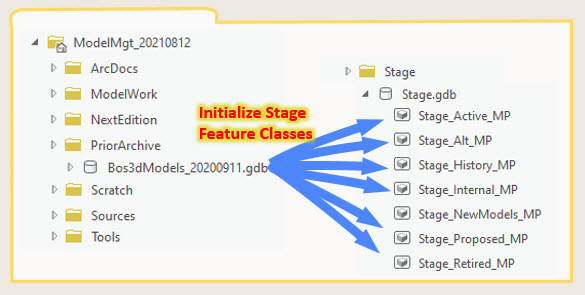
After migrating the schema, if necessary, the prior feature classes are copied to the Stage geodatabase, where the records may be modified.
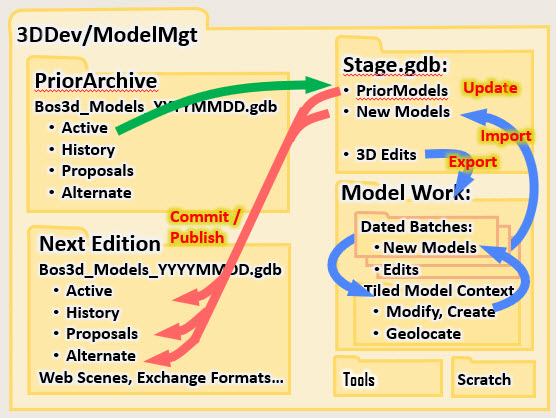
Models may now be imported and edited, and existing models may have their attributes updated.
New editions of the collection are formed by sorting the new models and prior archived models according to their new status values.
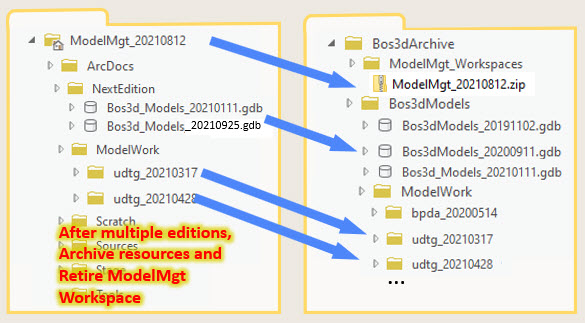
Several new editions may be produced and several new model batches processed in a single model management workspace. At some point, the workspace wil be retired, with the latest edition and the model batches and the workspace itself being archived.
Archiving Batches and GDB Editions
Model Batches include source material, tools that transform the sources to attributed multipatches, aalong validated OBJ modelStores reflecting the state of the models. When the multipatches are fully prepped and added to the Stage_NewModels_MP feature class, the model batch is zipped and the zip is copied to the Bos3D_Archive/ModelWork folder.
Geodatabase Editions of the model collection are archived to Bos3d_Archive/Bos3d_Models whenever a new PriorArchived edition is initialized in the ModelMgt workspace. These geodatabase editions include all of the multipatches, including retired and expunghed models and most importantly the catalog information that can be used to regenerate the model collection form the ModelStore if necessary. Other geodatabase editions can be archived as well.
Zip Files are Read-Only The zip files saved in the archive are read-only. If there is ever a need to recover resources from the zips, they may be expanded in ther archive folders, but the zip files should remain un-touched. If an important update is made to one of the archived model batches, you may zip it again with a bersion letter appended to the name.
A tour of the ModelMgt ArcGIS Pro Project
The ModelMgt.aprx file, located in the ArcDocs folder is an arcGIS pro project that references the tools and data-sets involved in making changes to the model collection and publishing new editions. Before digging into the tasks, it will be useful to check the critical preferences settings in this project. Sometimes ArcGIS initializes these differently when you move or create a new project.
Project Options and Settings
In the Project window under Project > Current Settings Notice that we have set the following:
Under the Project > Options > Geoprocessing settings make sure that the following two options are set asd follows
- Checked: Allow geoprocessing tools to overwrite the results of prior geoprocessing operations
- Unchecked: Remove layers that reference data overwritten by geoprocessing tools
Geoprocessing Environment Settings
THe following geoprocessing environment settings shold be checked each time you begin using a new copy of the ModelMgt workflow project:
- Coordinate System: Massachusetts State Plane Mainland Zone (U.S. Feet) FIPS 2001.
Vertical Datum: NAVD88 U.S. Feet (Height) - Current Workspace: Scratch\Scratch.gdb
- Scratch Workspace: Scratch\Scratch.gdb
Project Scenes, Maps, Layers and Query Views
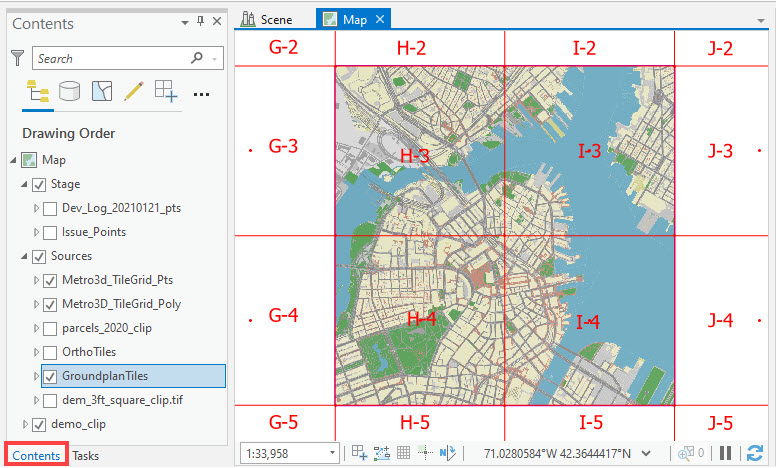
The ModelMgt project includes two maps and two 3d scenes. Take a look at these in the maps folder on Catalog Pane. As you can see there is a map and a scene that is set up for editing multipatch models, and the default map and scene which are used in most other functions. Most of the tools and tasks, except the ones associated with editing, assmue that your active view (and table of contents) is the default Scene view.
The layers in the Map table of contents provide an opportunity to discuss some of the important source layers that are used by the model management processes. As we look through them, set your table of contents to View Source Folders so you can see where these data-sets are stored within the Sources folder of your ModelCollection_Mgt workflow folder.
2D Layers
While we are looking at the layers in the 2D map, you ought to explore theier attributes and properties in the ArcGIS project.
- Dev_Log_Pts: The development log is a table that carries information related to the status of projects under review. Each agency will have a different variation on this. In Boston, this table keeps track of the status of each project after each meeting of the review board. It also contains the projectID and the URL for the project on the BostonBuilds web site. There is a lot of other useful information about projects, but those three fields are the ones that are most important for understanding which models may need to be promoted, demoted or superseded.
- Issue Points: used to mark issues such as missing models. Issues with existingt models are marked on the QA_Issue field on the model's attribute table.
- Tile Boundaries and Points: are referenced from the Bos3d_Master repository. The tile center and corner points have elevations -- necessary for making sure our terrain meshes extend exactly to the corners of each tile.
- DEM_3ft_Square_Clip: A raster elevation model clipped for our demo project. This elevation model is used to check the vertical placement of models and to calculate the geometric envelope for new models. In a production environment, this elevation model would be a 1-foot resolution raster coverng the full extent of the tile scheme.
- Parcels 2020: Parcel boundaries are used to add parcel IDs and Assessor map URLs to new building models. When parcel data is updated, you may want to update the assessing links.
- Groundplan Tiles and Ortho Tiles These are the tiled images that were produced for the tiled downloads. They are provided with the demo data-set for reference.
About Re-usable Layers and Styles
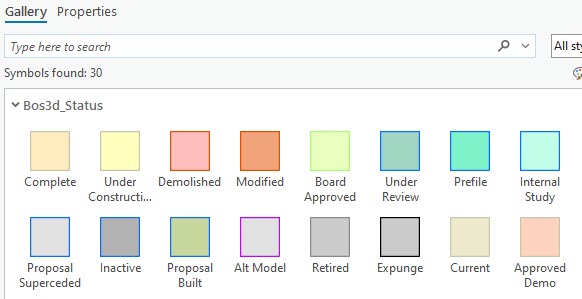
More about styles and pop-ups is covered in the citySchema web page, Scene Layers and Pop-Ups for Web Scenes.All of the layers for viewing 3d models use the same symbolization for models according to status. The master layer for this symbology can be found in the ArcDocs\Layers\MP_Status.lyrx file. This symbology can be applied to any multipatch layer using the Appearance\Import function as described in ImportSymbology from another Layer.
The particular face and edge colors fro multipatch features / according to status, can be found in the saved Bos3sStatus Style-Set pictured below.
Read more about managing re-useable styles can be found in the official ArcGIS manual page
Save your Styles!
Any time you change the treatment of the status symbology, it would be a good idea to re-save this master layer.
Many group layers are also saved in the layers folder. It is a good habit to save any of the major group layers to this location any time you make changes to them.
The project option Geoprocessing > Remove Layers that are overwritten by geoprocessing tools should always be un-checked. Unfortunately this is not the default, and even un-sets itself when a project is copied. As a result, the symbology for layers will get wiped out when geoprocessing tools delete and re-generate data-sets. You will learn this the hard way many times but be happy that the prior state of these layers and group layers can be recovered.
Note to ESRI: it would be great if there was a way for layers to reference the symbology from a saved layer and update themselves automatically.
About Definition Query View Layers (DQV)
The process of updating city-wide multipatch feature classes is complicated because it is often the case that new models can overlap with old models, and because of time required to draw and re-draw city-wide model collections, you can't quickly flick the city-wide model layers on and off to understand how the models relate to each other. To help keep the model collection visually sorted the 3D scene makes use of Definition Query Views that use SQL expressions to limit the features displayed. Views based on definition queries are identified with DQV appended to their names.
Views filtered with definition queries are much quicker to flick on and off. Another handy feature of this technique is that multipatch models sort themselves into appropriate views and symbology immediately when their Status attribute is updated.
Layers that have definition query filters applied are named with a DQV suffix so that people don't get confused by omitted records.
The 3D Scene and its layers
The 3D scene and its table of contents is the hub of the ModelMgt project all of the tools reference layers from the table of contents of this 3D scene. It is also the view upon which all review and edit tasks are carried out.
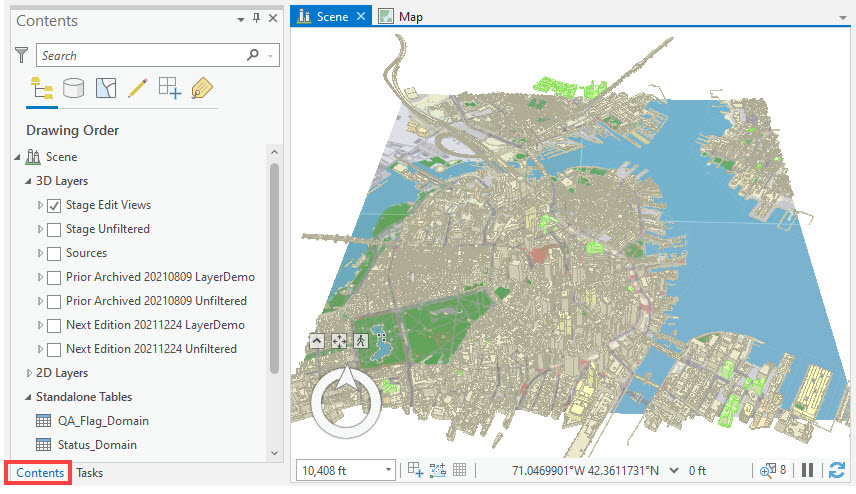
3D Layers
- Prior Archived Unfiltered Group Layer: This group layer includes a layer for each of the multipatch layers that were released with the prior archived model collection. These make up the initial state of the collection before any changes are made. No definitioan queries apply to these layers. These layers should be considered read-only. In case this layer needs to be reconstructed, a copy is saved in the PriorArchived folder.
- Stage Unfiltered Group Layers: This group layer includes a layer for each of the multipatch layers created for the next edition. In a brand new ModelMgt workflow folder this may not exist yet. It can be created by adding the Prior Archived Unflitered layer and changing the source references for each layer. This group layer should also be saved with the NextEdition geodatabase for the convenience of users who want to add it to other projects.
- Prior Archived and Next Edition Layer Demo: Represents the each of the multipatch feature classes in the prior archived edition, but with styling and definition query views that make it easy to review the collection, toggling the demolition candidates fromthe Active_MP feature class with models from Proposed_MP. Definition query views are identified by including a DQV suffix in their names. These layers are the basis for Scene Layer packages that would be published to ArcGIS on-line.
- Stage Edit Views: Because the staging process involves changing the Status of models, it can be difficult to see what is happening as new models sometimes completely cover existing models. This situation is made worse by the fact that flicking the Active_MP layer on and off can take minutes. To streamline the staging and review process, this group of Status-based definition queries and group layers provides a preview of the layers as they would appear inthe final layer previews. When staging status changes to the layers in this group, models appear to dissappear form one layer and appear on another when the status is changed. You may want to adjust these based on your own experience and preferences.
Explore Tasks and Tools
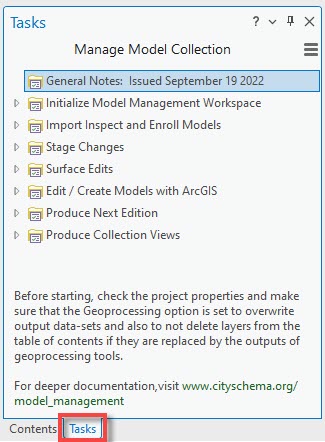
There are several procedures involved managing your model collection. The ModelMgt project uses Tasks to break the model management process into a sequence of stages. The tasks include instructions that guide theuser throughthe stages of initializing the workspace, adding new models, updating attributes, editing models and publishing the next edition. Most of the tasks are linked to geoprocessing tools that prompt the user for parameters and carry out procedures.
Click on View > Tasks to explore how the tasks order the steps organized as task groups. Expand the groups to reveal the individual tasks. These wil be discussed in detail below.
The technical user should be familiar with how tasks are put together with geoprocessing tools. While this new feature of ArcGIS pro does make things a little easier, unexpected issues may crop up that require some trouble-shooting skills.
Geoprocessing Tools
Most of the prepared tasks call on custom-made geoprocessing tools. To cut down on confusion with 3D models, we are going to call geoprocessing models "tools." Use View > Catalog Pane to expose the catalog on the right-side of the ArcGIS window. Expand the toolboxes group and the City3D_ModelMgt.tbx toolbox. You will notice that the first five tool groups have names that correspond with the task groups. Expand these and have a look at the various tools.
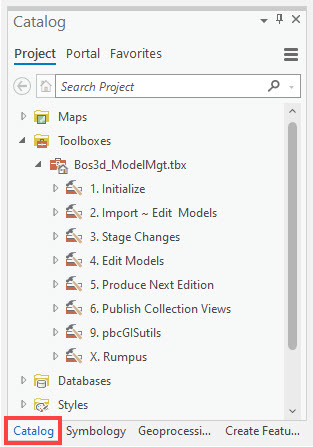
Notice how the individual tools are named with numbers corresponding to the tool group and letters referring tothe general order that they might be used. Sticking with this convention makes it easier to find the custom tools when confronted with the huge drop-down list that is used in the Task editor.
Not all tools are associated with tasks. SOme of them, such as the ones in the pbcGIS_utils tool group are handy utilities. The Rumpus tool group contains tools that you might create to preserve one-off procedures that you may want to repeat or re-use.
ArcGIS Tasks and Geoprocessing Tools are Self-Documenting
A very handy aspect of the ArcGIS geoprocessing framework is that custom-built tools automate many steps that can be thoroughly understood by examining the tool in Edit mode. We carry this further by adding graphic labels to the model itself where clarification and further instruction might be useful. With all of this, the tools can be considered self-documenting. This alleviates the need for a very detailed discussion of the internals of tools in this documentation. Right-click on a tool and choose Edit to have a look at the tools.
Users should be very familiar with trouble-shooting ArcGIS Geoprocessing tools and tasks. There are many ways that ArcGIS geoprocessing tools can get messed up. This documentation can't cover all of these possibilities.